iDevise主题修改备忘
为了使iDevise主题更适合异想博客的需要,我将对主题部分功能进行增添修改。大多数修改都可通用于其它主题,但部分修改只是为了满足个人偏好,也许会感觉比较无聊。对于一些简单的修改就几句话说明了,涉及代码的将会分点列出。
一些简单修改:去掉了更新(感觉iDevise_16.03.13版本的特效比较合意)、删掉了搜索Button(回车以搜索)、改了底部信息。
1、文章段落首行缩进、改段内间距
一般主题可用Chrome审查元素找到段落对应的CSS,加入:
text-indent:2em;line-height: 26px;即可,例如iDevise主题设置:
.single p{margin:0 0 10px;text-indent:2em;line-height: 26px;}2、图片清晰指向变模糊
在index.php的头部找个地方加入以下代码:
3、删除评论提示语句
其实这是对Wordpress修改,没涉及主题。我的博客打算只开放留言页面评论,其它的文章都关闭评论功能,但是底部会显示“评论已关闭”,所以去掉文字提示。
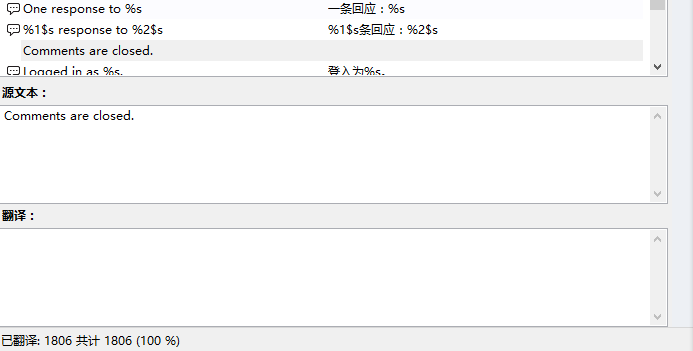
用Poedit软件打开wp-content\languages\zh_CN.po文件,找到“Comments are closed.”条目,翻译内容删掉,加入一个全角的空格(这样显示出来什么也没有),保存编译为mo文件,上传到服务器。
4、禁用Google Open Sans字体
在functions.php文件中加入以下代码:
add_filter( 'gettext_with_context', 'wpdx_disable_open_sans', 888, 4 );
function wpdx_disable_open_sans( $translations, $text, $context, $domain ) {
  if ( 'Open Sans font: on or off' == $context && 'on' == $text ) {
    $translations = 'off';
  }
  return $translations;
}
5、更改新的文章结束样式
移植官方2016年4月15日设定的样式,占用位置更小更美观。
在style.css中粘贴新主题的代码替换旧主题中对应的位置:
/* 文章结束 */
.ending{display:block;width:100%;height:60px;margin:30px 0;border-top:1px dashed #ddd;border-bottom:1px dashed #ddd;position:relative;}
/* 赏赐 */
.reward{width:30px;height:30px;line-height:30px;font-size:18px;color:#fff;border-radius:100px;text-align:center;position:relative;
border:1px solid #f1b60e;background:#fccd60;cursor:pointer;position:absolute;left:66px;top:14px;}
.reward ul{z-index:1;display:none;position:absolute;top:-60px;right:-280px;padding:6px;font-size:13px;width:260px;height:150px;background:#fff;border:1px solid #e6e6e6;box-shadow:0 1px 1px 1px #efefef}
.reward ul:after,.reward ul:before {position:absolute;content:'';border:10px solid transparent;top:50%;left:-20px;margin-top:-10px;}
.reward ul:before{left:-21px;border-right-color:#e6e6e6;}
.reward ul:after{border-right-color:#fff;}
.reward:hover ul{display:block}
.reward ul li{display:inline-block;width:48%;padding:10px;color:#333;line-height:20px;}
/* 简介 */
.about{position:relative;position:absolute;left:20px;top:14px;}
.about img{width:30px;height:30px;border-radius:100%;border:1px solid #ccc;cursor:pointer;}
.about p{z-index:1;display:none;position:absolute;top:-8px;right:-280px;padding:10px;font-size:13px;line-height:26px;width:260px;background:#fff;border:1px solid #e6e6e6;box-shadow:0 1px 1px 1px #efefef}
.about p:after,.about p:before {position:absolute;content:'';border:10px solid transparent;top:12px;left:-20px;}
.about p:before{left:-21px;border-right-color:#e6e6e6;}
.about p:after{border-right-color:#fff;}
.about:hover p{display:block}
/* 社交 */
.sns{margin:0 10px;float:right}
.sns li{float:left;margin:0 10px;}
.sns li i{line-height:56px;}
.sns li.weibo i{color:#d55}
.sns li.tencent i{color:#3cf}
.sns li.douban i{color:#5a7}
.sns li.zhihu i{color:#2ae}
.sns li.github i{color:#000;line-height:58px;}
然后还要删掉index.php中的两句:
<i>若你觉得我的文章对你有帮助,欢迎点击上方按钮对我打赏</i>
<h4><?php the_author_meta('display_name');?></h4>
原效果如上,改动后如下。
6、博客头部加下拉进度条
此处参考了奇拉笔记的代码,在style.css中添加如下代码,不要放到文件太后面了,最好放在“初始化”之后,“页头”之前:
/* 横向下拉进度条 */
.scroll-bar {position: fixed;top: 0;left: 0;z-index: 4500;display: none;width: 0;height: 2px;background: #000;}
在functions.js里的$(window).scroll(function(){});里加入如下代码,具体插入位置见图:
$(".scroll-bar").attr("style","width:"+($(this).scrollTop()/($(document).height()-$(this).height())*100)+"%;display: block;");在index.php里加入如下代码,最好放在header到/header之间:
<div class="scroll-bar"></div>
最终效果如图:
7、WordPress后台雅黑字体
将下面代码添加到当前主题functions.php中即可:
function admin_lettering(){
    echo'<style type="text/css">
     body{ font-family: Microsoft YaHei;}
    </style>';
    }
add_action('admin_head', 'admin_lettering');
8、字体
前后台均使用微软雅黑,这里不详细说了。
- 上一篇: poilife开张第一篇
- 下一篇: STM32学习笔记:简介及MDK入门


